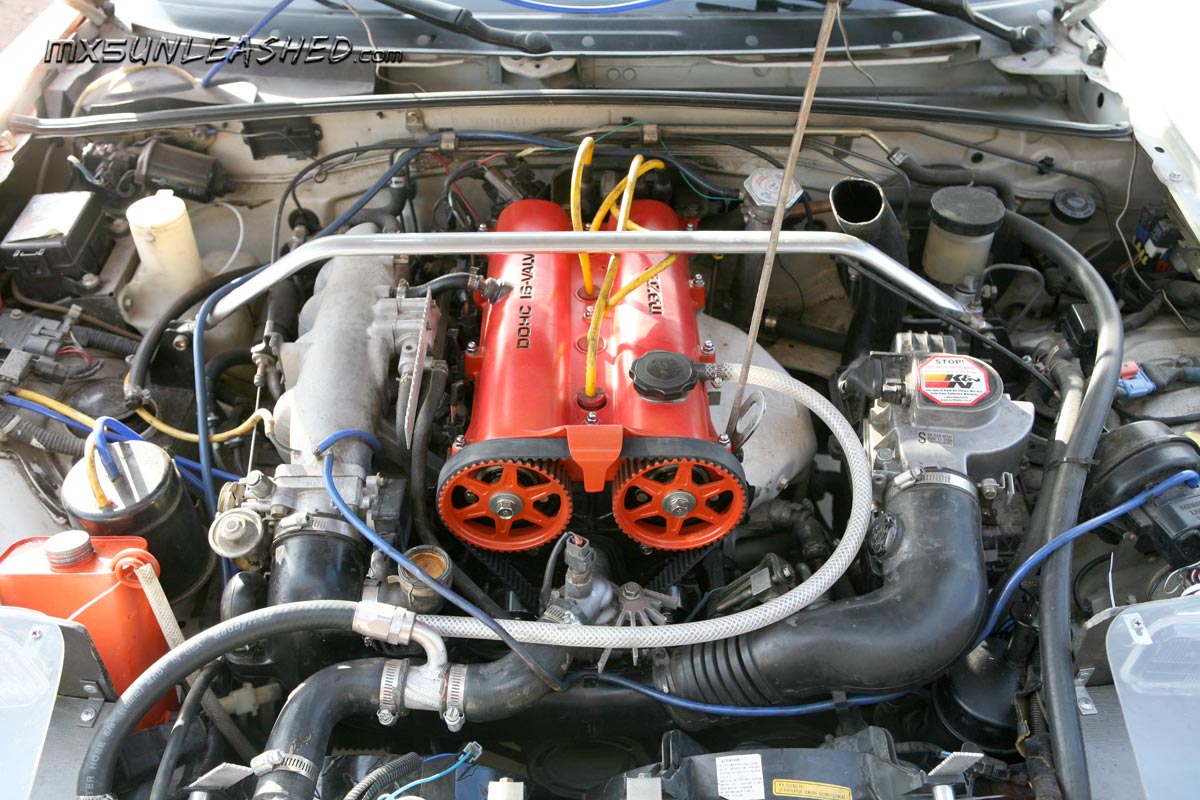
Replacing timing belt (cambelt), water pump, crank and camshaft seals
Forward (Read it!): First of all let me tell you about the experience just so you are sure you want to do this by yourself and not take your car to your friendly neighborhood mechanic. What you have to expect is: a lot of cut fingers, busted knuckles, and your back maybe sore after wards. Two most difficult parts of the whole project was pulling out the radiator and trust me you want to do it because it gives you room to maneuver. The second and most difficult part of all of this was pulling out the cam and crank shaft seals especially crank ( what a B!@t# ). The rest of the project its just unbolting and bolting things back on and some aligning. Also if it is your first time make sure you have at least a full weekend to do this. It took me 4 days because I was modifying some parts as you will see, I was taking pictures, and I did not have these sweet instructions to guide me through. On a final note I am assuming that you have some kind of technical skills. Now that you know what is in store for you the choice is yours. 2 Helpful Videos: |
Tools and Parts
Here are a few things you need before starting:
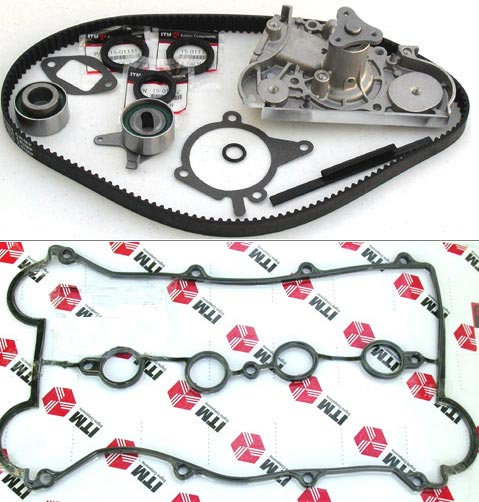
Timing kit which should include: Timing belt (duh), valve cover seal, water pump with 2 gaskets, 2 camshaft seals, 1 crankshaft seal, 2 pulleys. (you can buy it on Ebay for less then a $100)
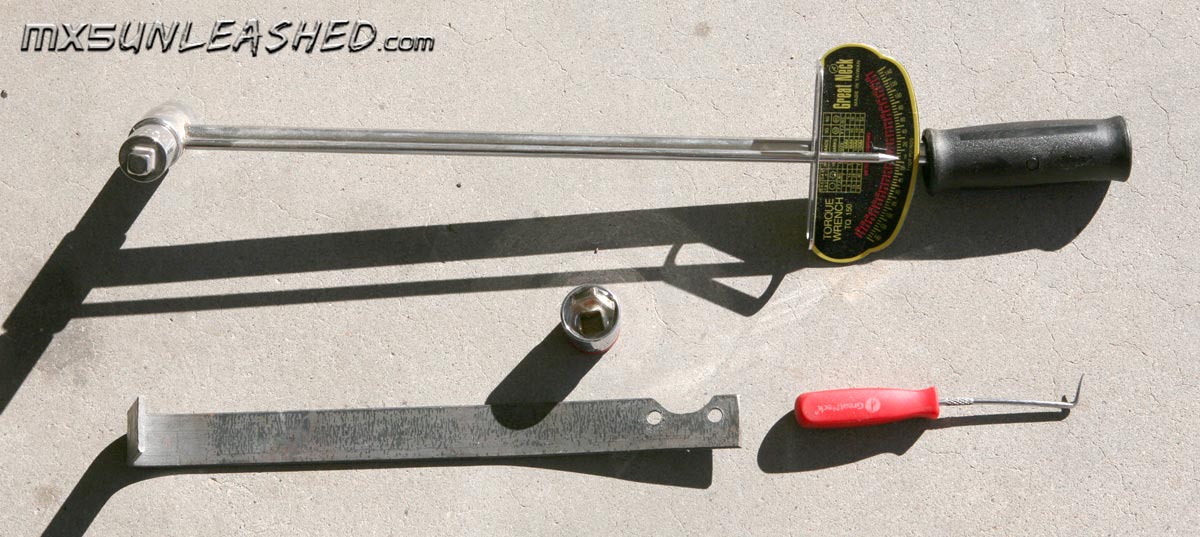
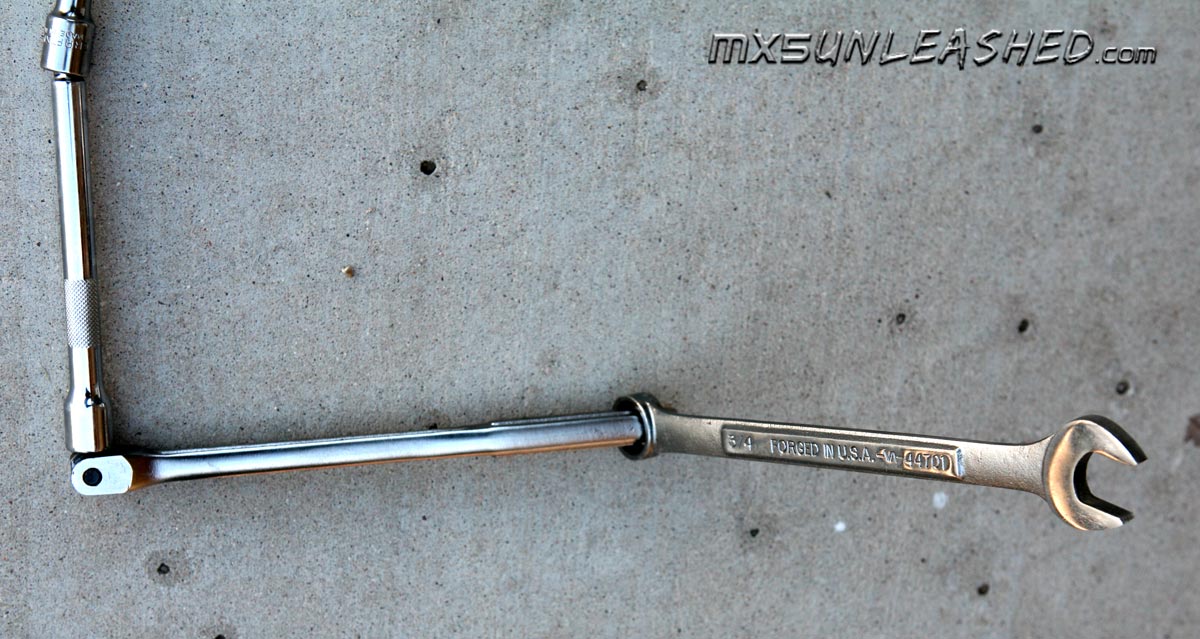
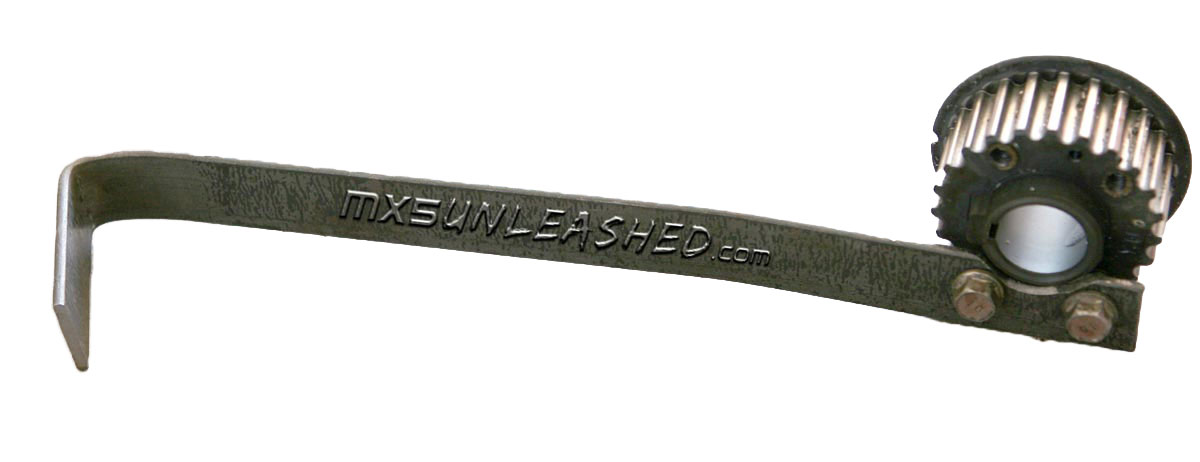
Special tools (these are the tools you may not find in a regular tool set that you should have if you are going to do any kind of repair): torque wrench, 21mm socket for your crank shaft bolt, owl or curved end tool that is tough and pointy, and a tool to hold your crank while you are unbolting it or putting it back on, a piece of tough metal 1" wide and 14 inches long will do, when you unbolt the belt pulley of the crank shaft you will have a perfect template to drill and grind the holes, or just buy it on E-bay. Also you should change the oil after it's all done.
Taking stuff
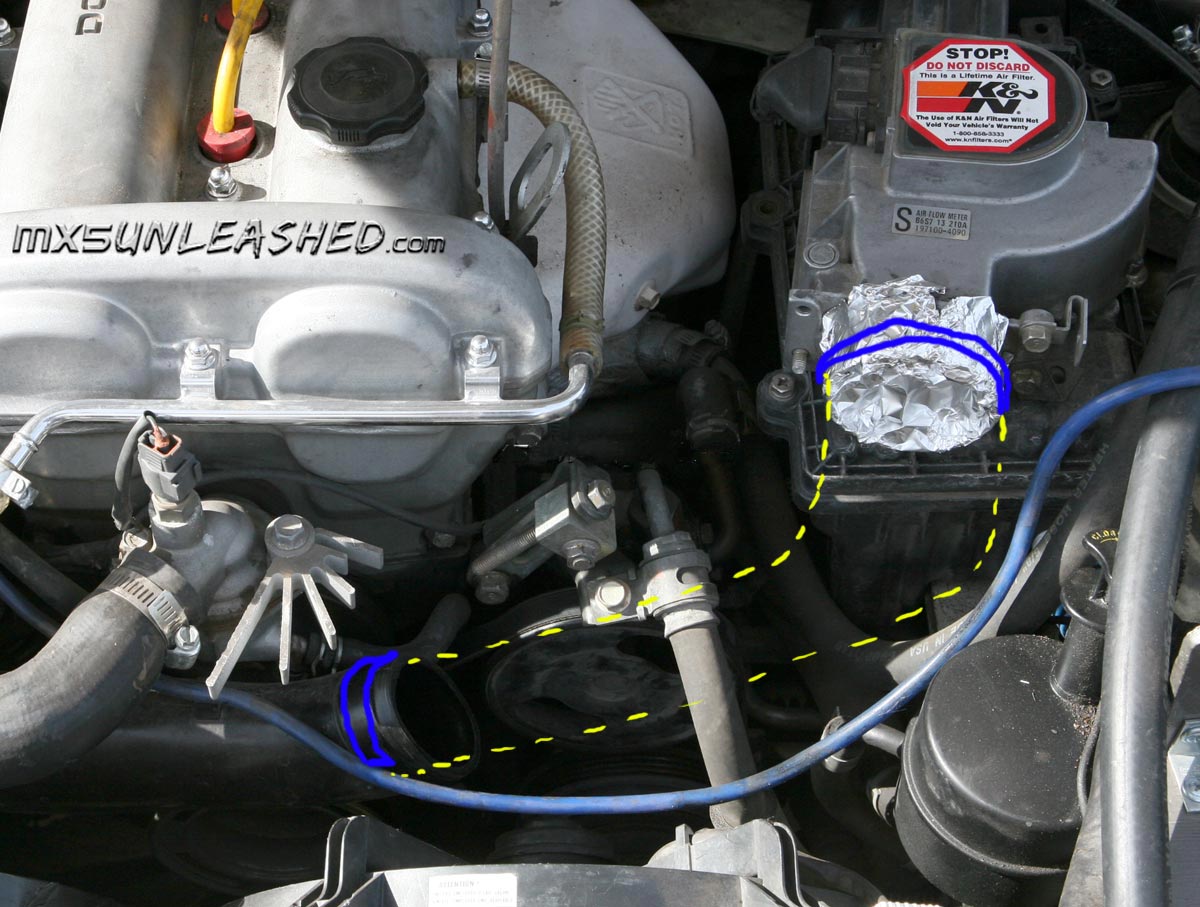
Intake: Undo the clamps holding the part of the intake closer to the air-filter box. Then pull off the piping. Cover the hole of the MAF with something so that the dirt will not get in, I like aluminum foil because it is easy to shape and it stays that way.
Then remove all the clamps from the throttle body side of the intake and pull it out. (You may notice a lot of modifications on my car you can e-mail me about them if you have any questions.)
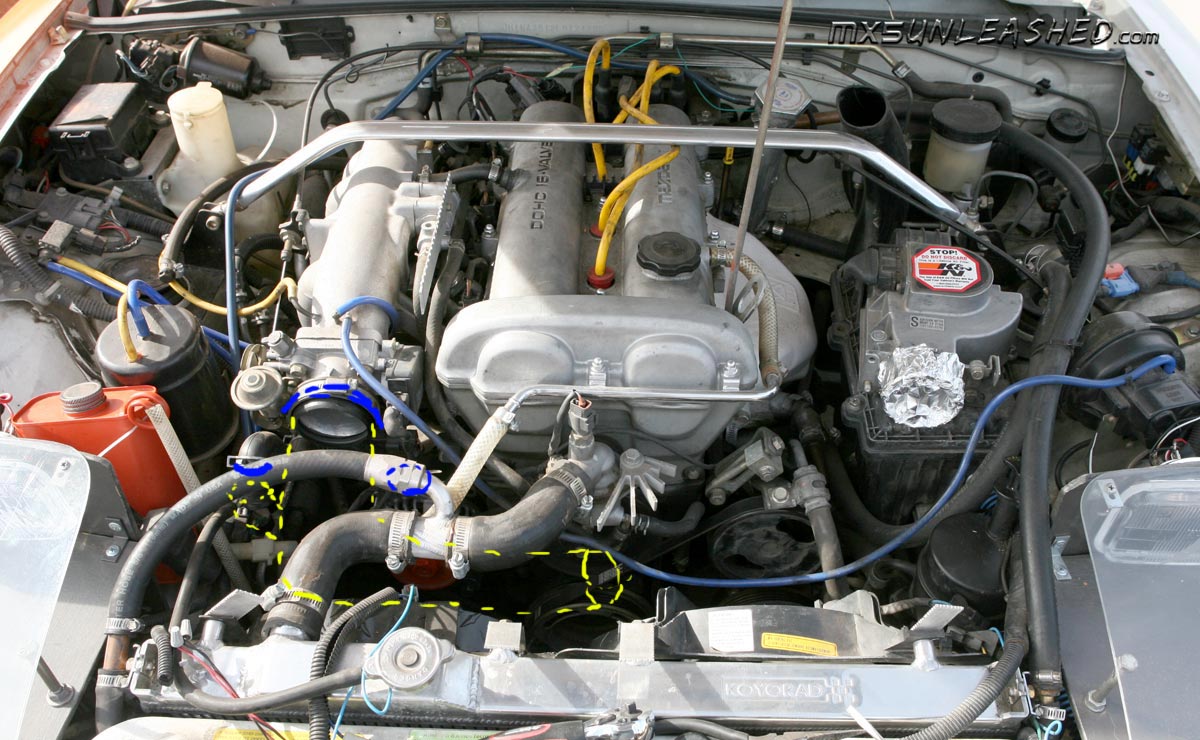
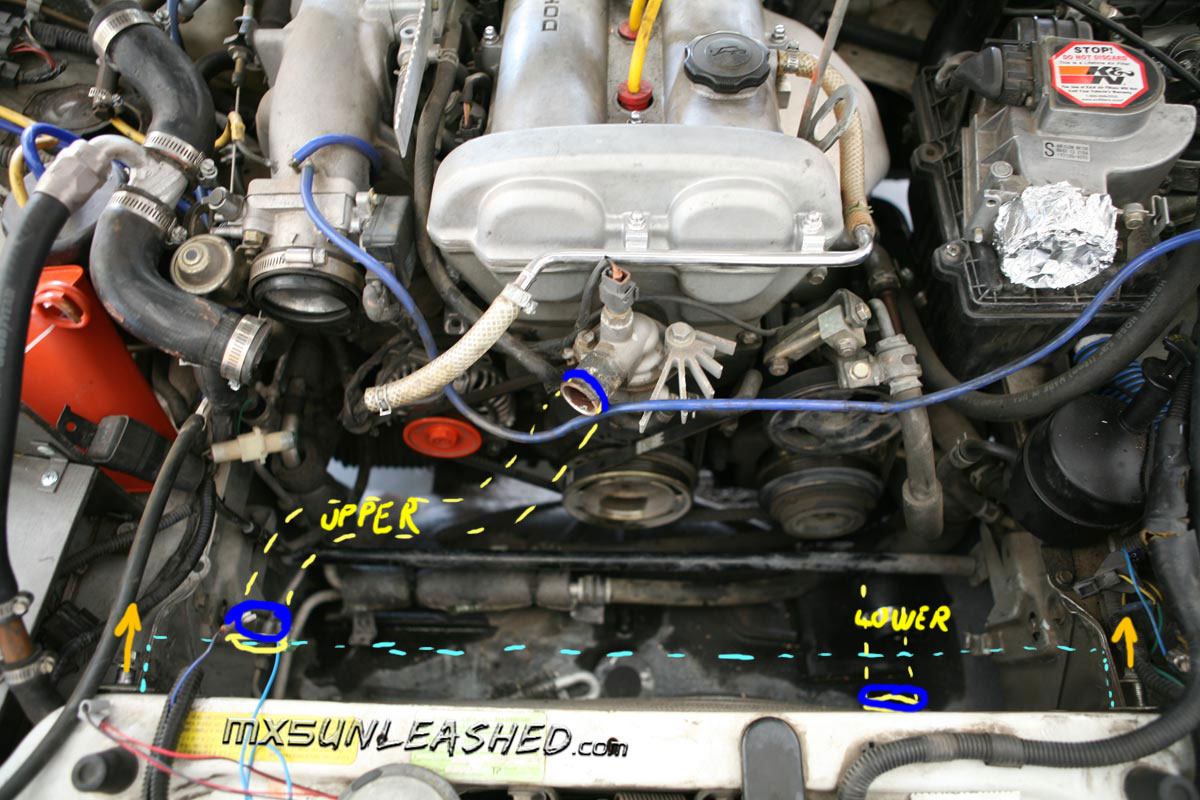 Radiator: obviously you are going to have to drain it. To remove it, undo two screws holding it and two hoses going to it upper and lower one plus little hose for over flow. I was able to wiggle the radiator out with out removing the fans but if it makes easer for you go ahead, in any case make sure you disconnect the fans. This will give you a lot of room to maneuver. Radiator: obviously you are going to have to drain it. To remove it, undo two screws holding it and two hoses going to it upper and lower one plus little hose for over flow. I was able to wiggle the radiator out with out removing the fans but if it makes easer for you go ahead, in any case make sure you disconnect the fans. This will give you a lot of room to maneuver. |
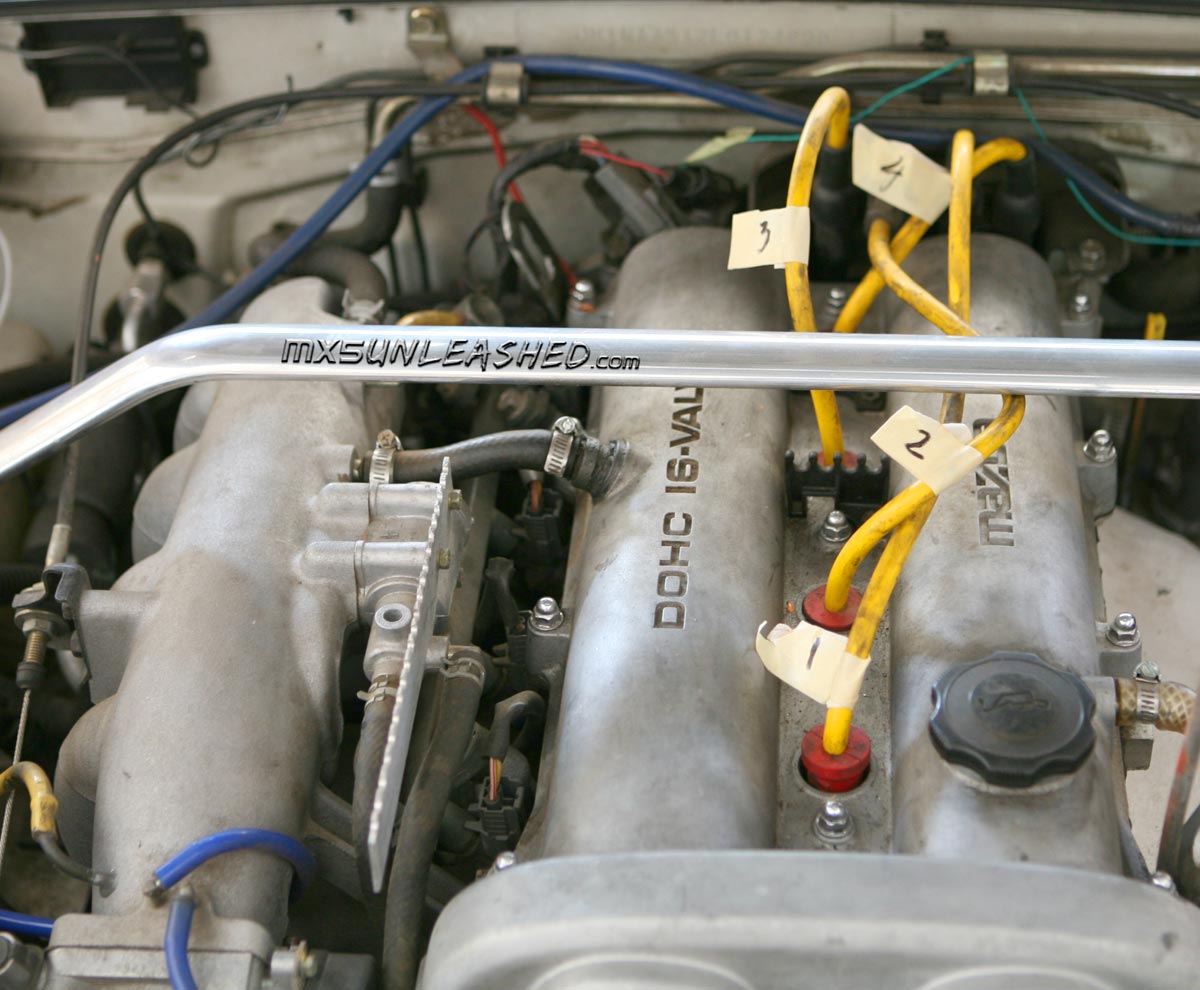
Ignition: Take regular tape and tape it to the ignition wires and then number them. Starting from #1 in front of engine and #4 at the end. This does not take too much time but it can be a life saver later when you are putting stuff back together.
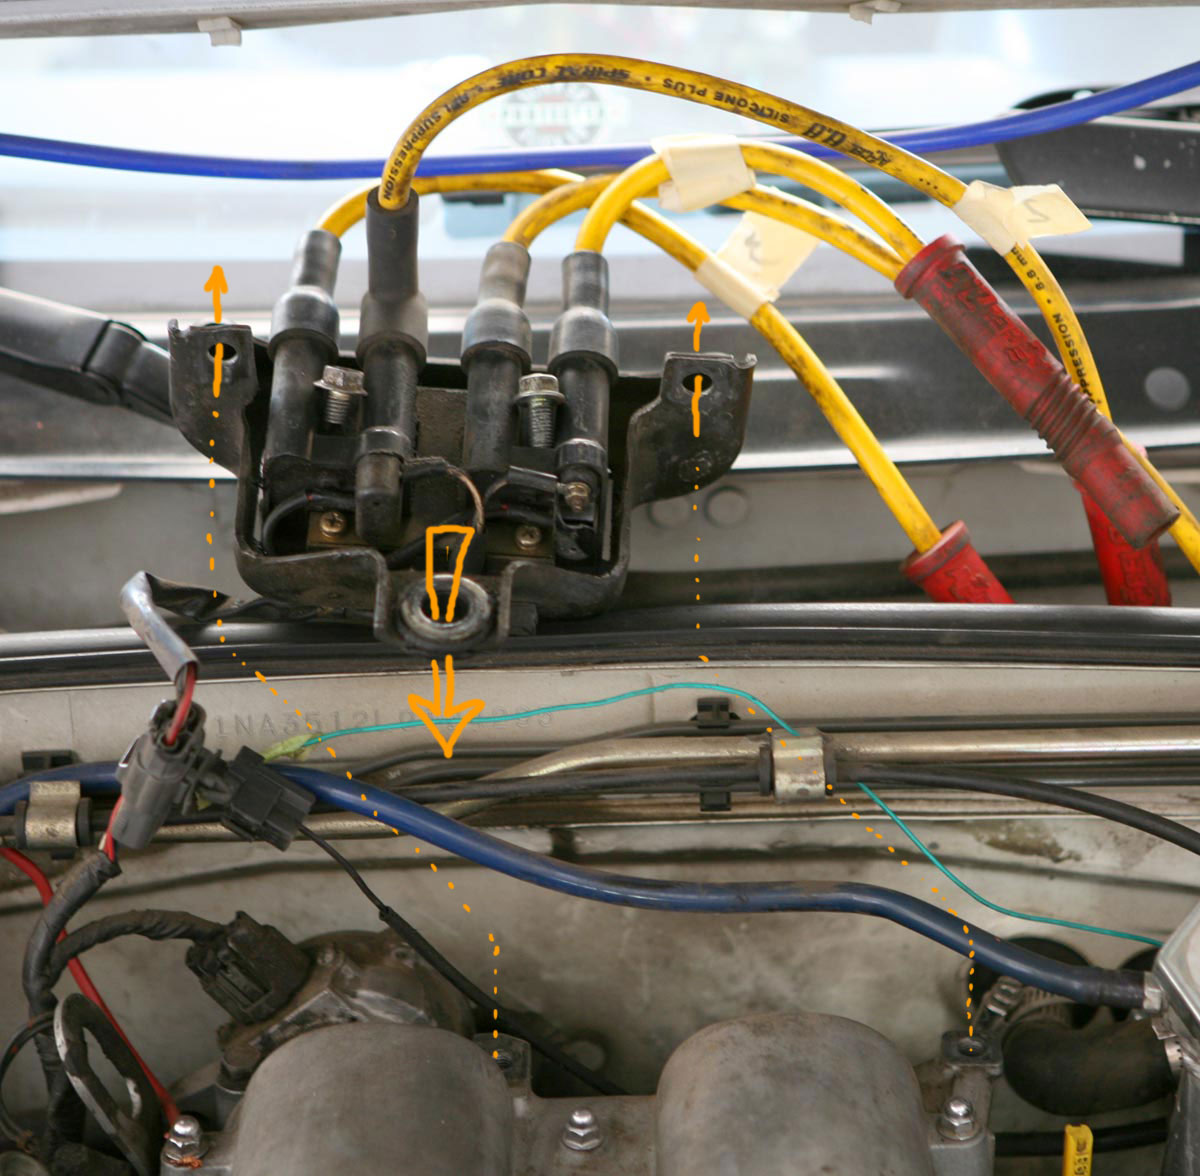
Next undo the coil pack 3 screws are holding it. 2 at the top and one big one on the bottom.
I set the coil-pack on the back fire wall and left it there it seemed fine. Make sure to put all the screws together with what ever you pull them off. This avoids confusion later on.
Vacuum lines: On the driver side pull out the PCV valve and on the driver side you should have disconnected the hose while removing the intake piping. I took mine off completely because i will do more modifications to the valve cover.


Since you have valve cover off and if you have some extra time you can install air/oil separator. -Click here- |
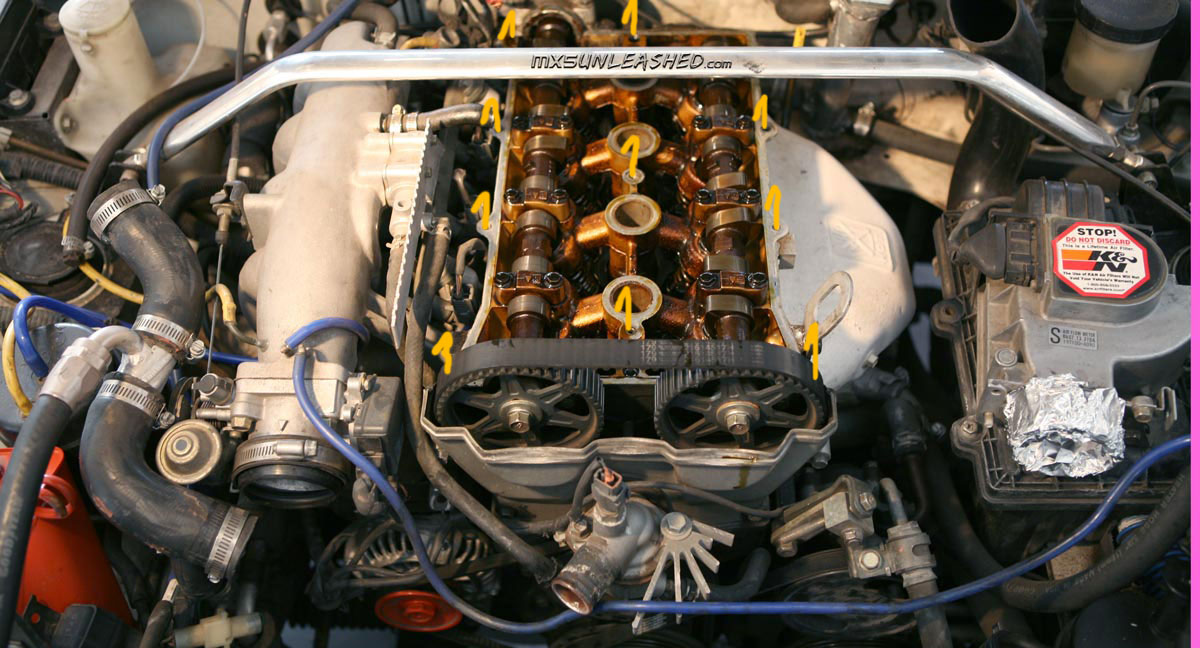
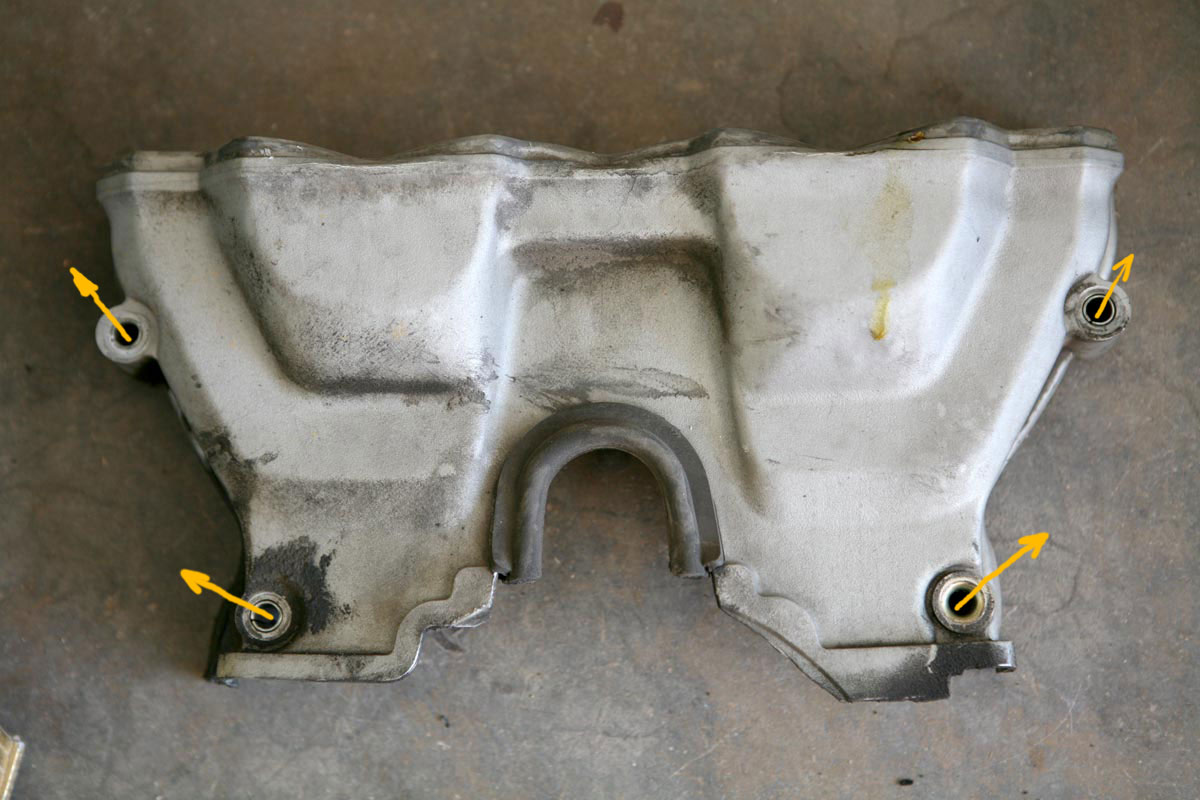
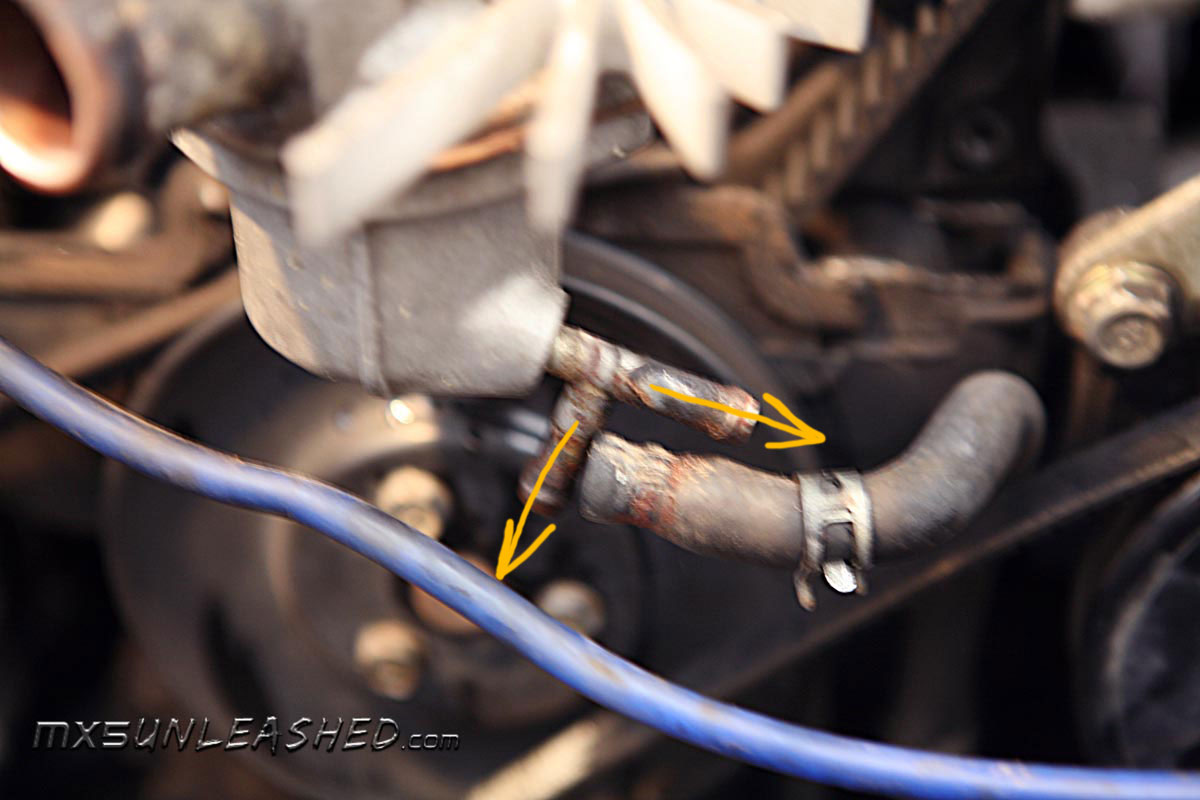
Undo 4 screws to take the plastic cover off. Unplug temperature sensor. Remove 2 hoses from the thermostat holder.
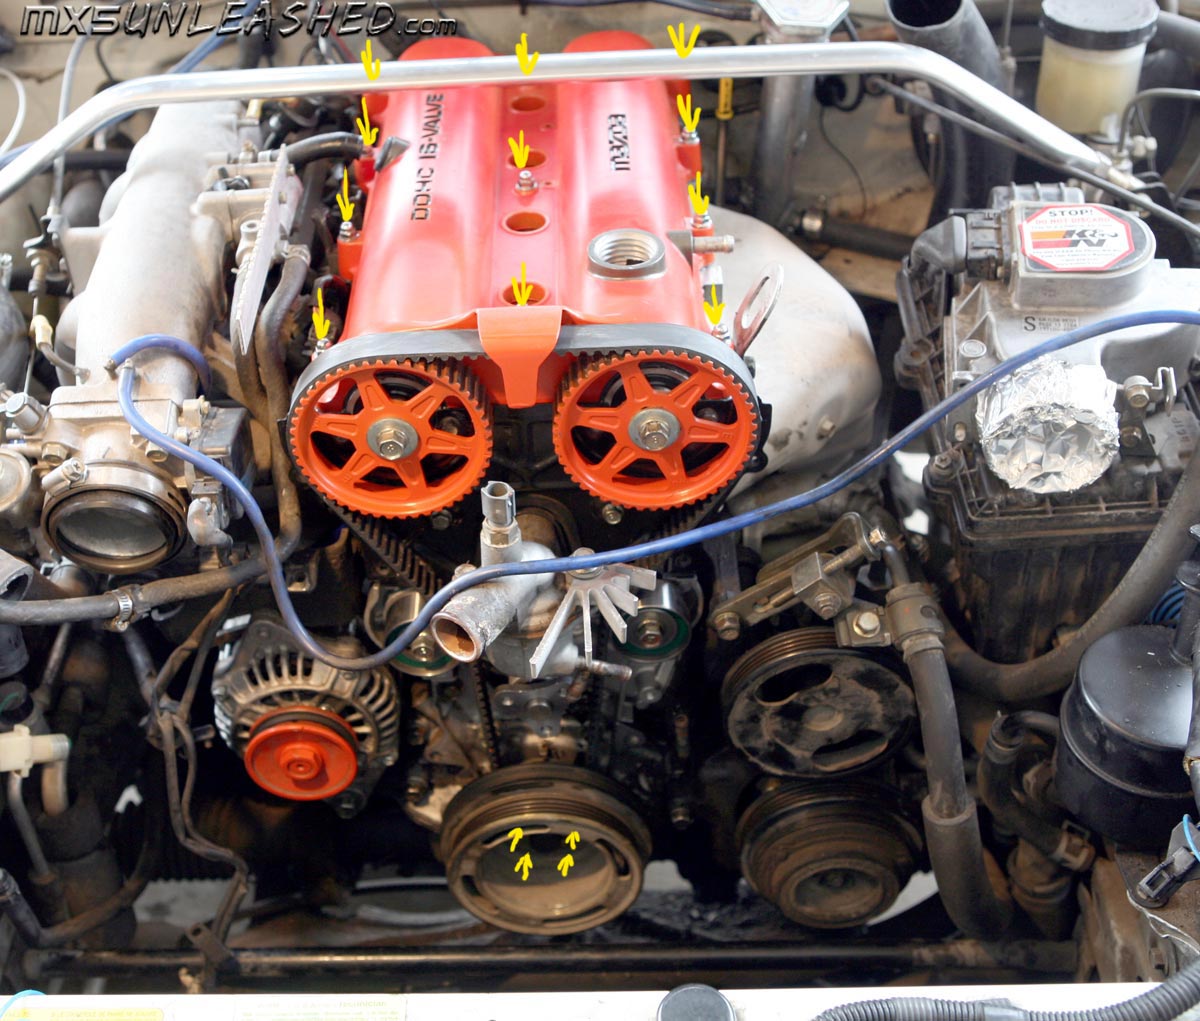
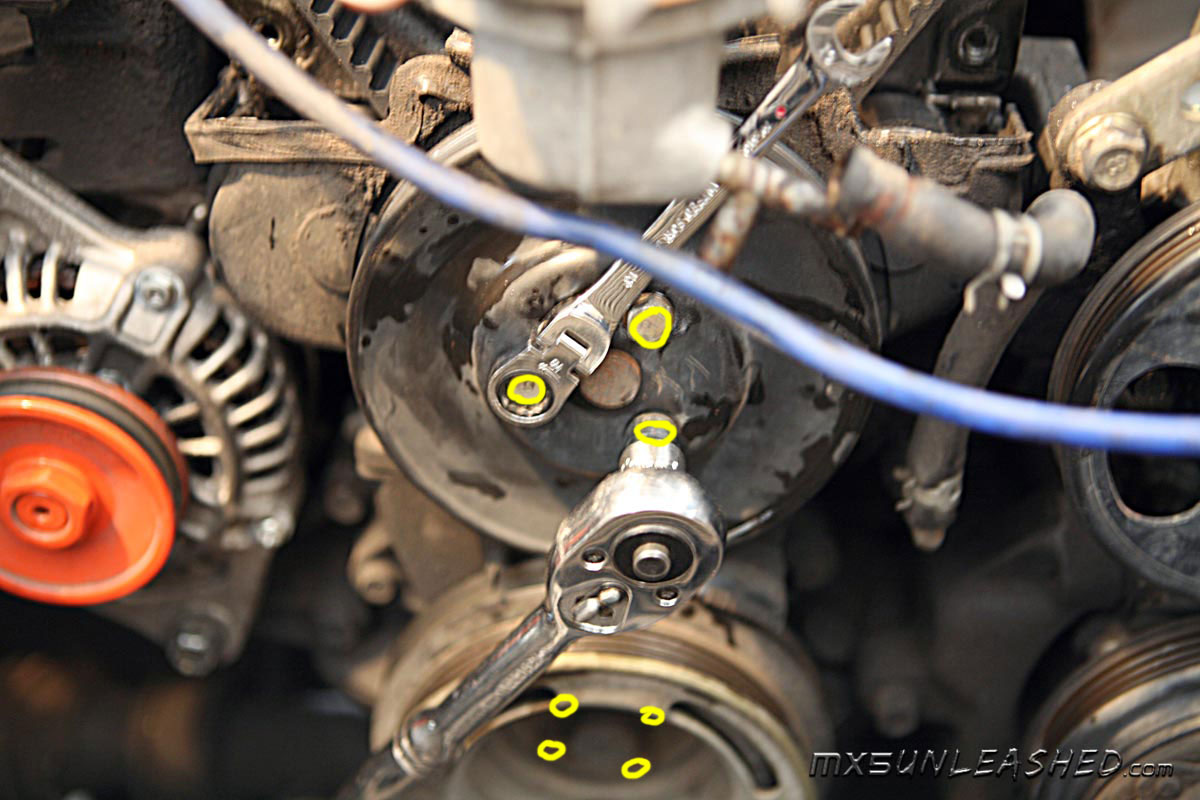 Water pump pulley and crank shaft pulley in the picture. The belts are already off but in retrospect I should have loosened the bolts first while the belts where still on to get more grip. In the picture you can see a little trick i learned to undo screws on rotating objects. You put a wrench on a bolt and on the other you put a wrench and muscle it loose but don't take out they screws until the are all loose that goes for both crank and water pump pulleys. Water pump pulley and crank shaft pulley in the picture. The belts are already off but in retrospect I should have loosened the bolts first while the belts where still on to get more grip. In the picture you can see a little trick i learned to undo screws on rotating objects. You put a wrench on a bolt and on the other you put a wrench and muscle it loose but don't take out they screws until the are all loose that goes for both crank and water pump pulleys. |
 Belts: you have two belts to remove, alternator belt and AC/power steering belt. First loosen all the screws and bolts until the belts are totally loose and you can pull them off. Then finish undoing the bolts of the pulleys and take them off. On the crank shaft pulley there will be some washers and other things, keep it all together so you know how they go back in. Belts: you have two belts to remove, alternator belt and AC/power steering belt. First loosen all the screws and bolts until the belts are totally loose and you can pull them off. Then finish undoing the bolts of the pulleys and take them off. On the crank shaft pulley there will be some washers and other things, keep it all together so you know how they go back in. |
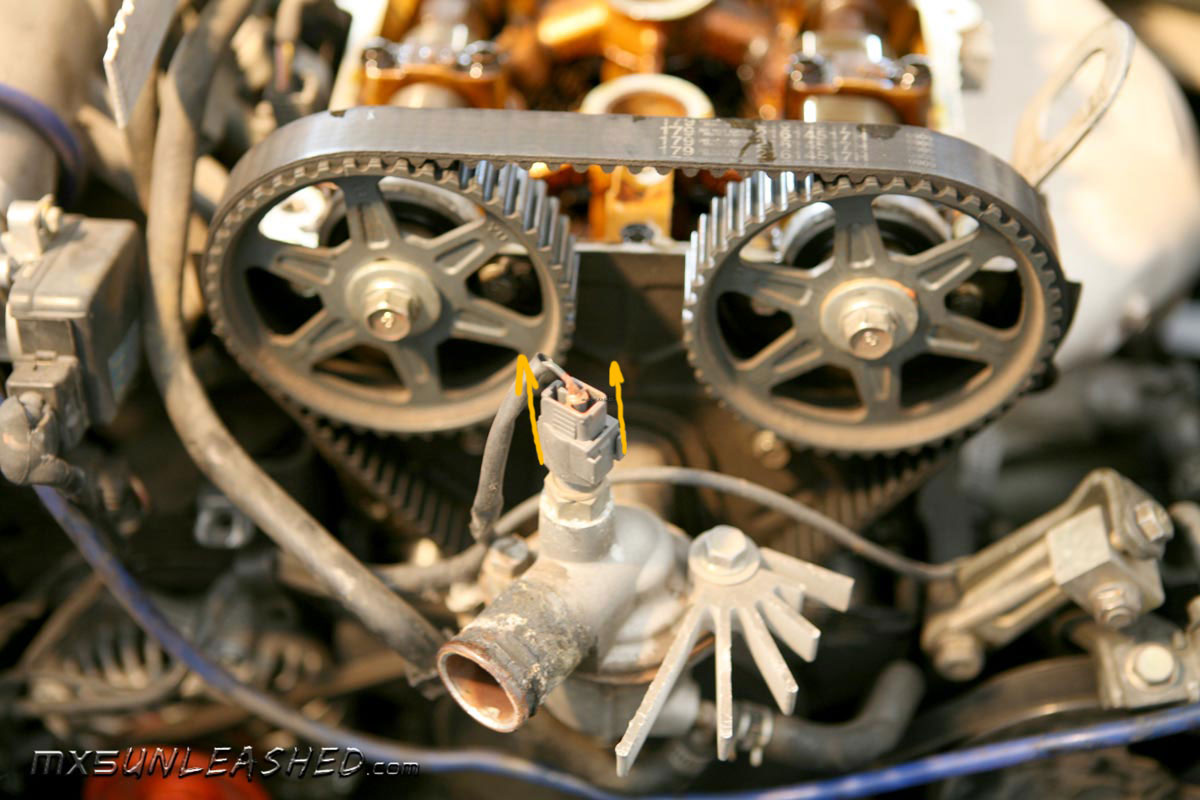
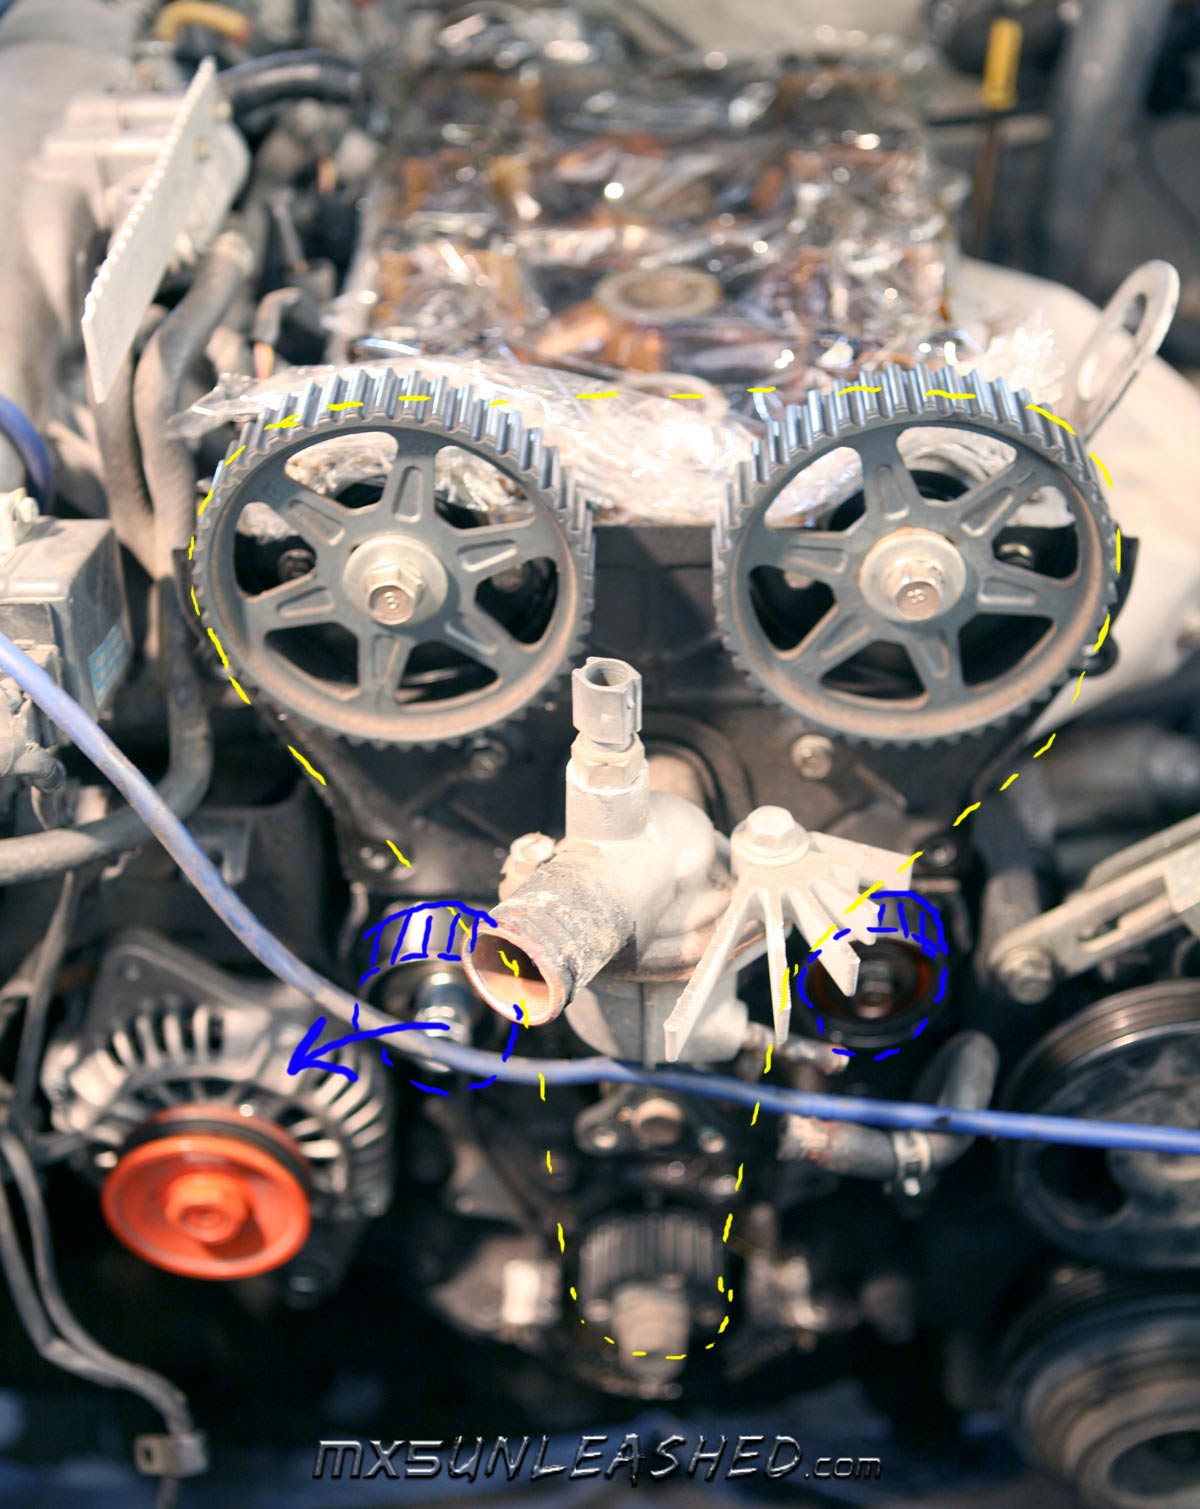 Timing belt: loosen up the tension pulley, push it to loose position and re tighten it. Then just pull off the belt don't worry about alignment of the gears. There is a neat trick to align them. After that take both of the tension pulleys off. Timing belt: loosen up the tension pulley, push it to loose position and re tighten it. Then just pull off the belt don't worry about alignment of the gears. There is a neat trick to align them. After that take both of the tension pulleys off. |
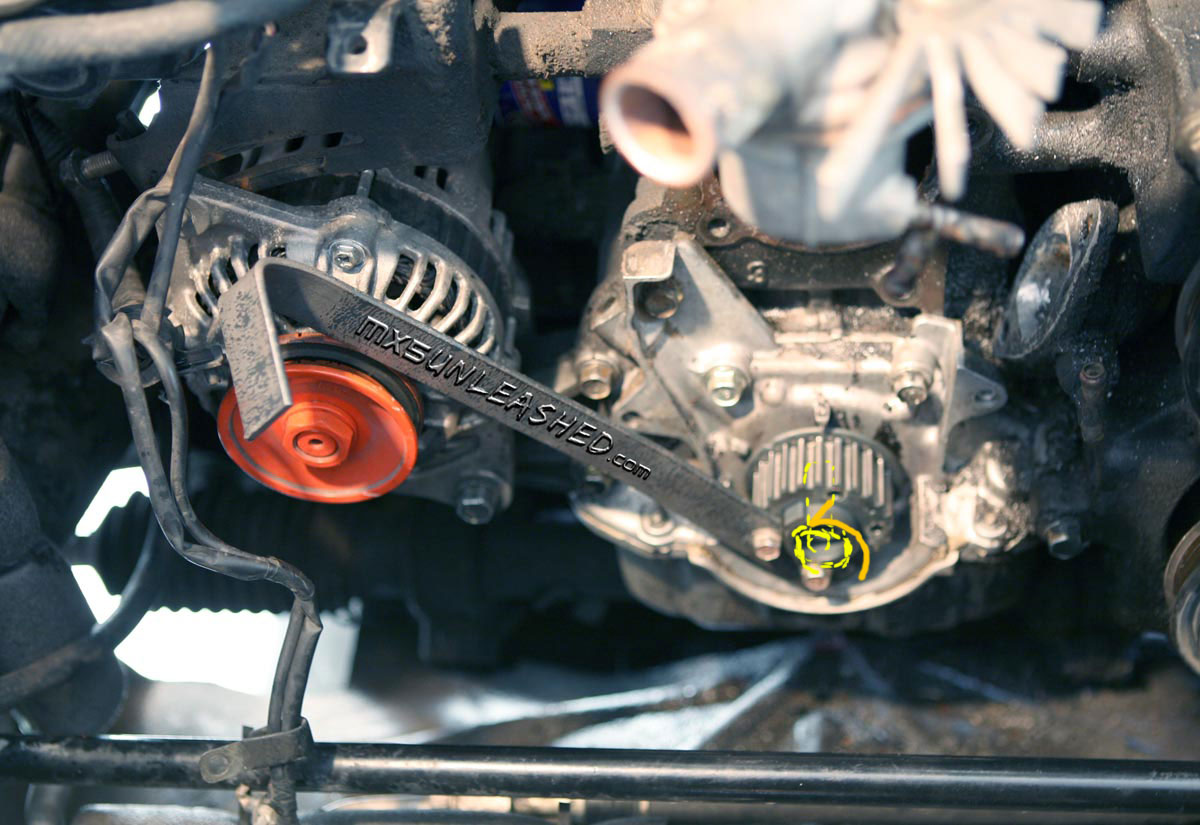
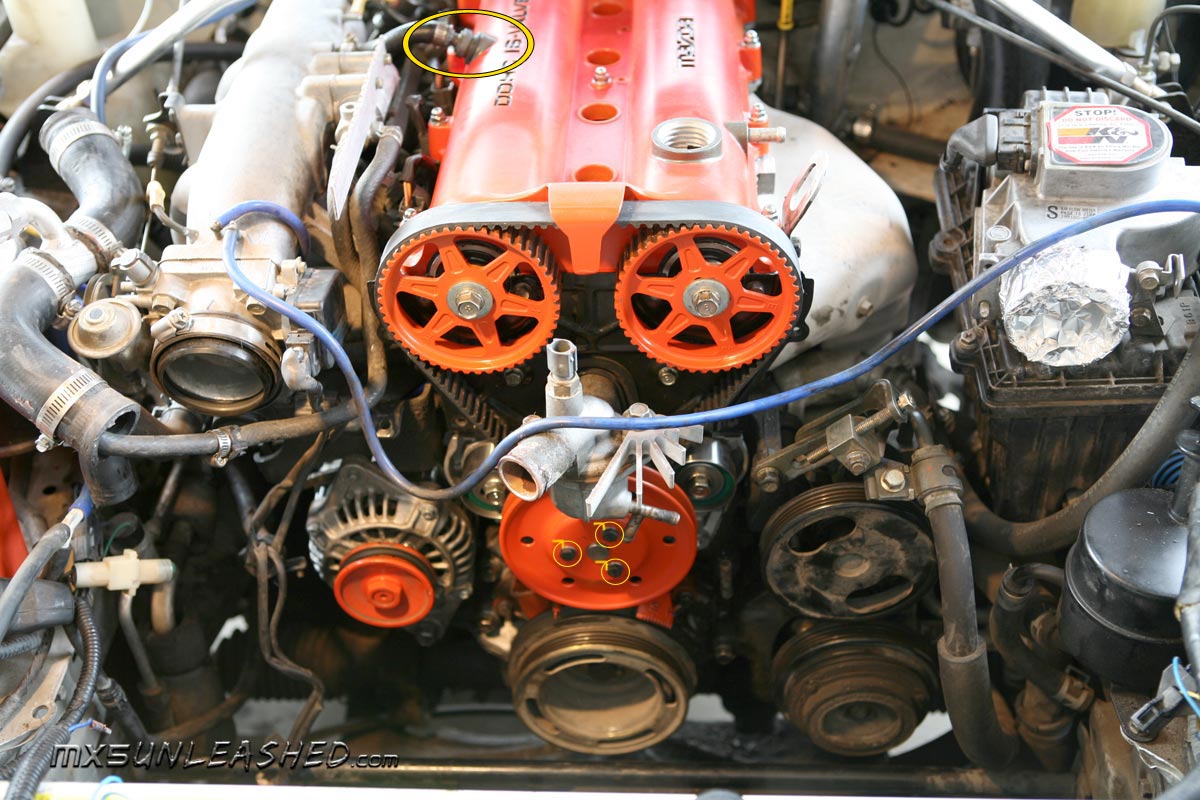
Camshaft Gears: To do those you will need to find a spot on the camshaft that is in the shape of a hexagon that's where you stick your wrench to hold the shaft from rotating, you can see it on the image. Once you have the wrench in place and propped on something non bendable undo the cam shaft screw, they are usually very tight. Then wiggle the gear off. Then mark it with a marker the position of the grooves of the camshafts (red marks) it helps later, and on a quick note both gears are interchangeable. Then for better access take off the back plate. (in green) This plate is instrumental in aligning the engine. Also the plastic cover with timing marks.

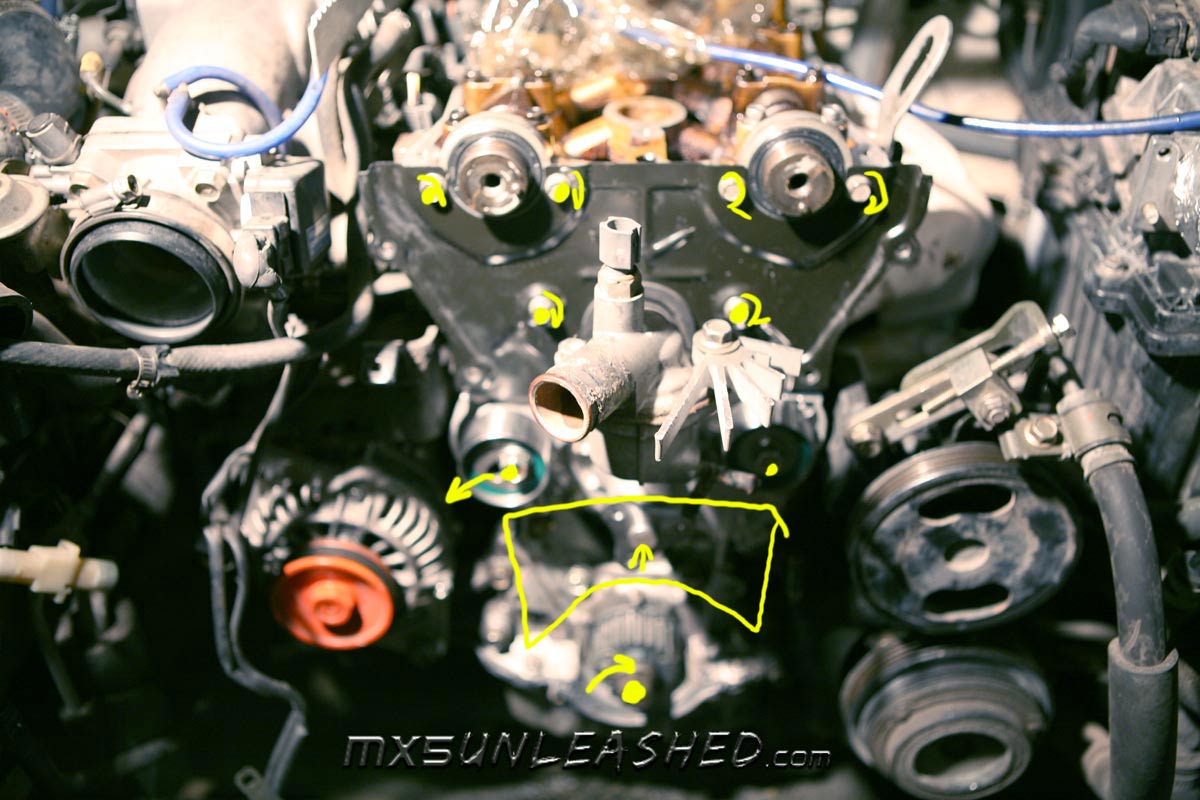
 Water Pump: 4 screws are holding it in the engine block and 2 hold the inlet. After undoing the screws, wiggle the pump out or pry it out depending on how stuck it is. Then clean up all the residue of the gasket. After that plug the hole with something so the dirt does not go in. Also you can see in the next picture the inlet has been blue printed to the gasket. (better flow) Water Pump: 4 screws are holding it in the engine block and 2 hold the inlet. After undoing the screws, wiggle the pump out or pry it out depending on how stuck it is. Then clean up all the residue of the gasket. After that plug the hole with something so the dirt does not go in. Also you can see in the next picture the inlet has been blue printed to the gasket. (better flow) |
Crank shaft pulley: by now you should have your tools ready since you had your pulley out and you could use it as a template. Screw it into the pulley. Then take your 21mm socket and go to town on the crankshaft bolt. Once it is off pull the pulley off slowly. Inside there should be a small metal piece that goes to the notch for alignment, note how it came out so you can put it back in the same way, and it goes without saying to keep it in the safe place so you know where it is.
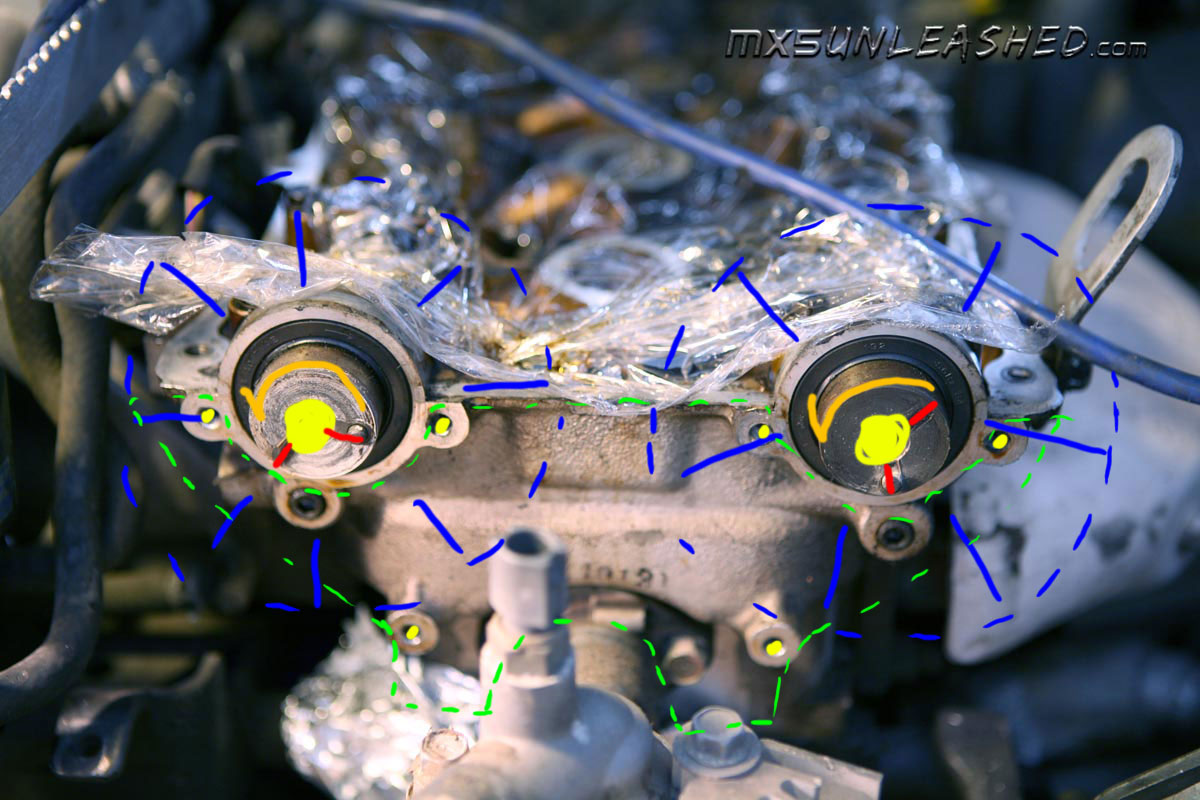
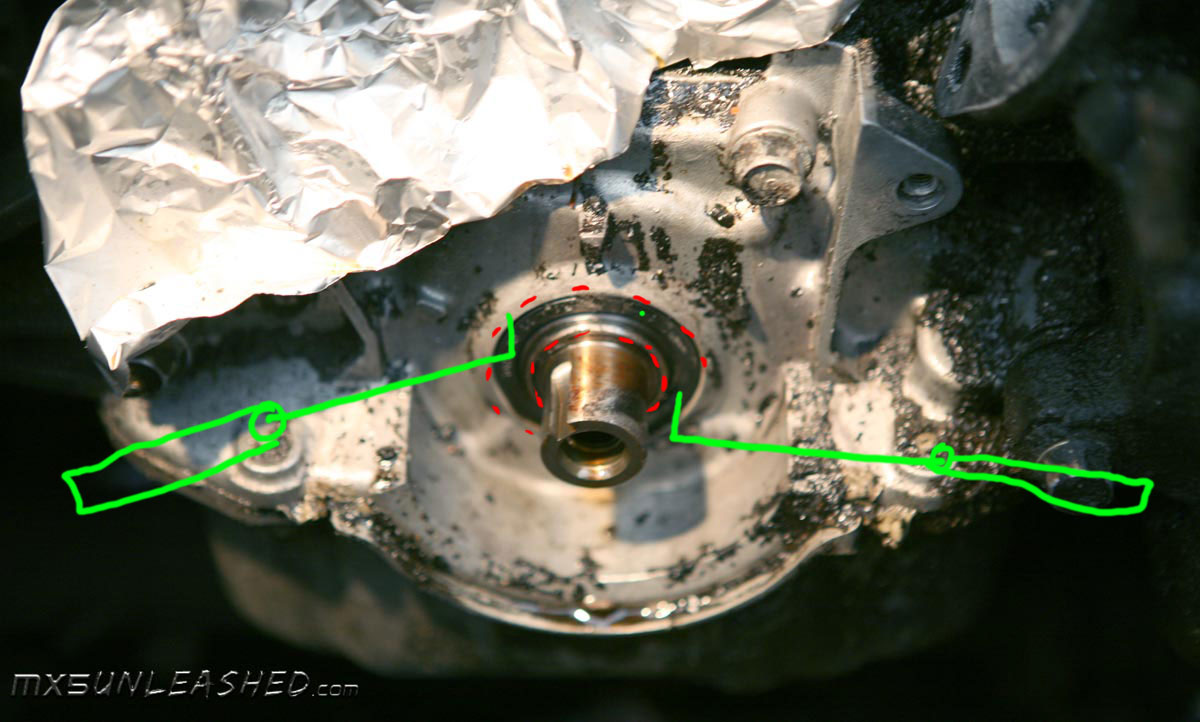
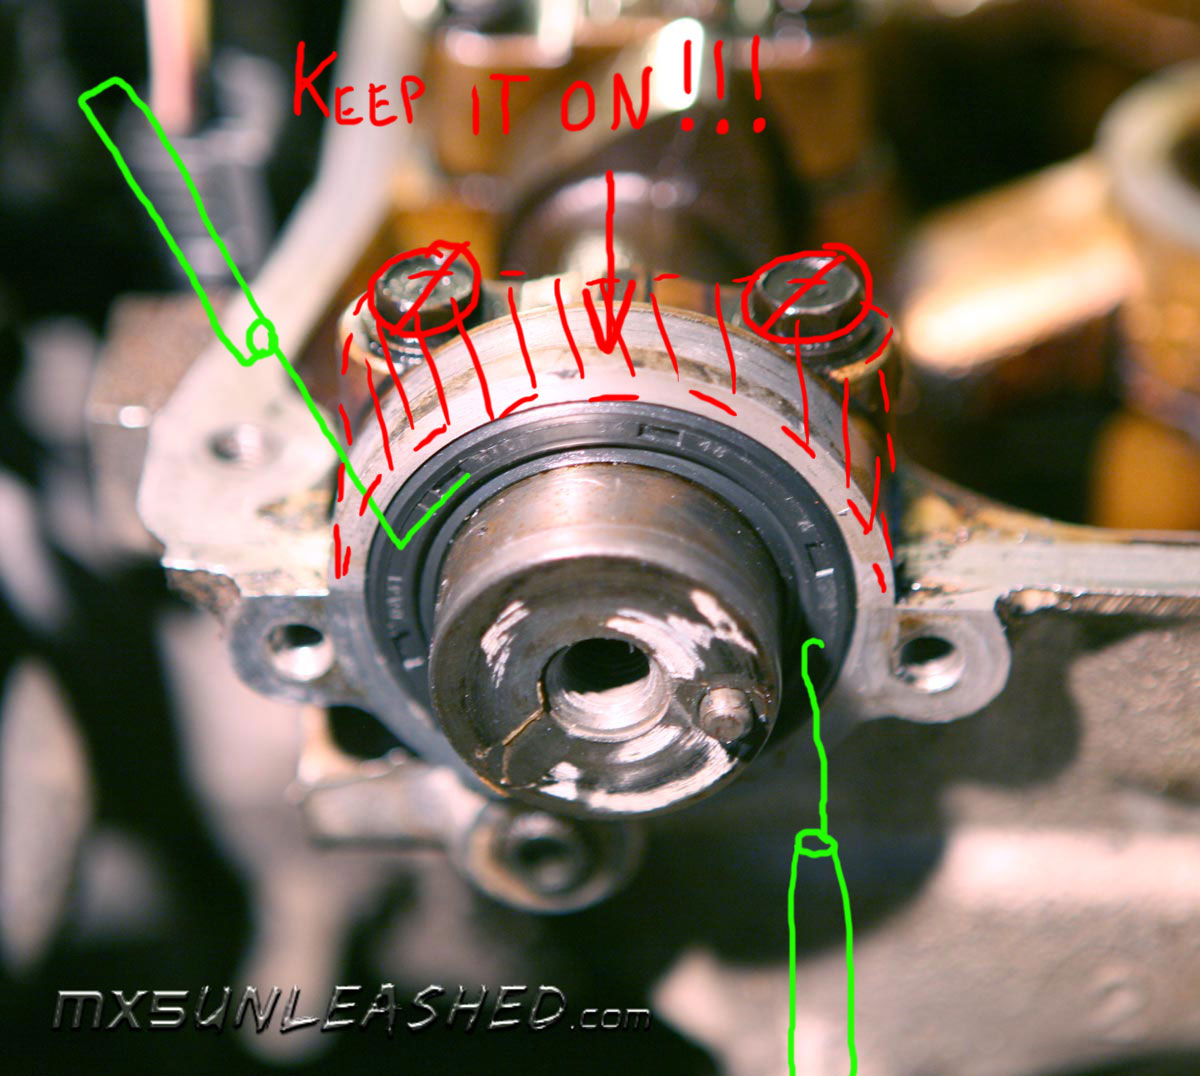
The cursed seals: This is where i acquired most of the cuts. First remember how deep they are sitting in, take a picture if it helps, but if they are not leaking this is how deep they should go, if they do leak they may just be old or the last time they did not go deep enough or they were put in crooked, any way start pulling them out with awls you will destroy them in the process but that is why you have a new one. IMPORTANT: What ever you do, do NOT scratch the shaft or the casing in which the seal is sitting. I'm assuming this is how a dentist feels when ripping out a wisdom tooth - putting all his strength into ripping it out without damaging the surroundings. Also on the camshafts do not take off the upper part of the seal holder because while tightening the screws back you may snap them ( I found out the hard way and extra hours of work were needed ). Then clean the orifices with like carb cleaner and make sure no part of the seal stayed in the hole.

Now take a nap, go have a drink, go to sleep and start again the next day, just take a mental break because the next part is critical and you need to be in a good mental state.
Putting stuff back on. (Most of the screws - make them nice and tight, for important stuff I 'll provide the Ft-lbs.)
Seals: Ok putting them back is much less stressful than taking them off. First make sure they are oiled up with engine oil. Then put them over the shafts and get a big socket and evenly tap them with the hammer till they reach the same place as they were before you took them out. If you don't have a big socket to go over the shafts get a dole tool and tap it evenly (VERY IMPORTANT TO PUT THEM IN EVENLY)


 Putting stuff back: few things at first water pump, I highly recommend putting thin film of silicon on both of the gaskets of the water pump. Then both backing plates, top with alignment marks and bottom with timing marks. Then the pulleys on the water pump make sure the tension pulley is in open position. Then put back the crank shaft timing pulley, then tighten it with our special tool (1990 80 to 87 and 1991 and later 116 to 122 Ft-lbs ) Putting stuff back: few things at first water pump, I highly recommend putting thin film of silicon on both of the gaskets of the water pump. Then both backing plates, top with alignment marks and bottom with timing marks. Then the pulleys on the water pump make sure the tension pulley is in open position. Then put back the crank shaft timing pulley, then tighten it with our special tool (1990 80 to 87 and 1991 and later 116 to 122 Ft-lbs ) |
 Camshaft Gears: Align the gears with the notches and marks we made before and remember that both gears are exchangeable so you can't mess that up. Just make sure the letters I and E face forward. So wiggle the gears in and put the screws back in and tight them ( 37 to 44 Ft-lbs). Remember to hold the shafts still, there is a spot on the shafts to put the wrench on. Camshaft Gears: Align the gears with the notches and marks we made before and remember that both gears are exchangeable so you can't mess that up. Just make sure the letters I and E face forward. So wiggle the gears in and put the screws back in and tight them ( 37 to 44 Ft-lbs). Remember to hold the shafts still, there is a spot on the shafts to put the wrench on. |
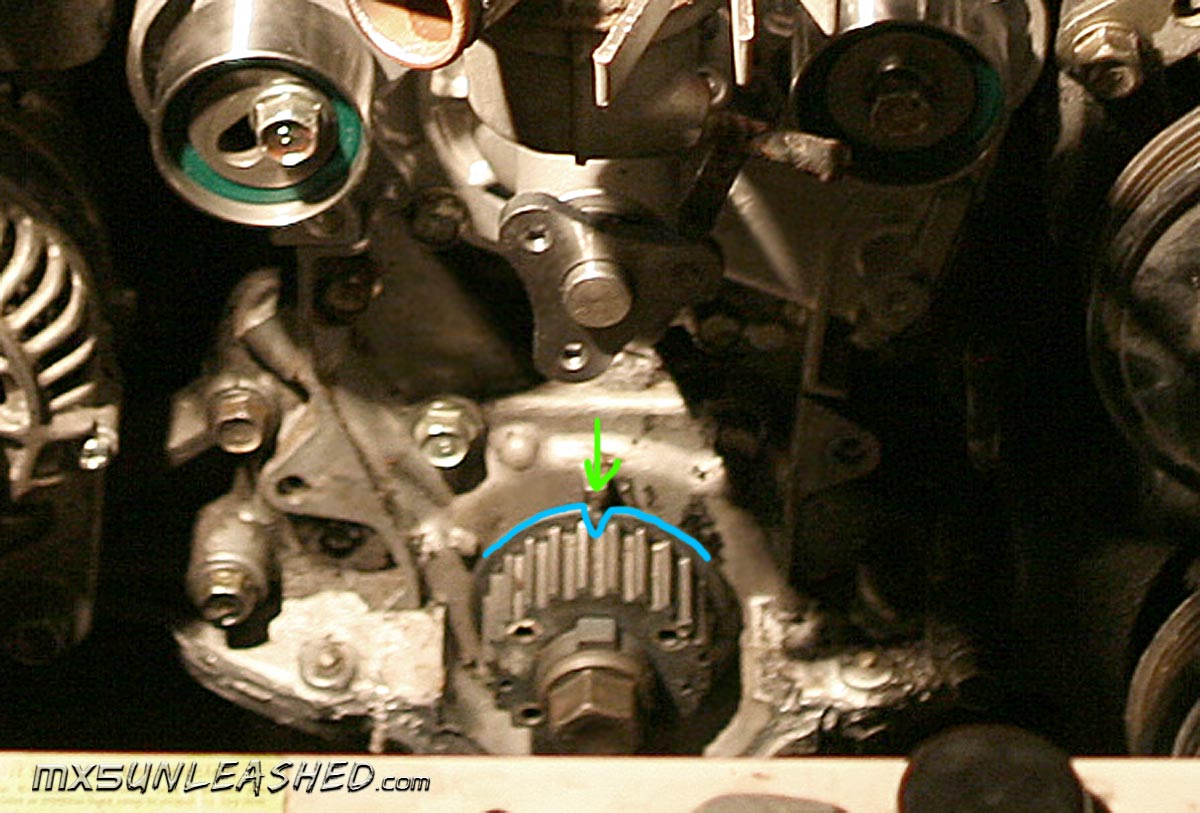
Timing Belt Alignment: First crankshaft, right over the crank pulley their is a little nub in kind of a V shape. Then align the notch on the rear part of the pulley with the little nub. Now the camshafts, the drive site (intake) will have " I " at 12 o'clock and " E " and the mark between the gears. On the drivers side (exhaust) put the " E " at 12 o'clock and " I " at the mark between the gears. Then start putting the belt on start from the top gears and clamp the belt to the gear with a binder clip or laundry clip. Move to the next gear and do the same and then through the tensioners and through the crankshaft pulley. Now one of the pulleys will be slightly off, that's because the tensioner pulley is not set yet. Putting the belt on is a bit tricky but make sure that all marks are aligned and work it on. Once the belt is on, loosen the tensioner and let the spring tension the belt then tighten both pulleys ( the tensioner and idle are 27 to 38 Ft-lbs). Then quick check, using your 21 mm socket rotate the crank shaft ( Clock wise, that's the direction of the engine spinning )till the crank shafts make a full circle. If after that every thing lines up your, good to go, if not redo the alignment and try again.

 Valve cover and Crank shaft pulley for the V-belts: With the valve cover, first clean then valve area. I cleaned it with carb cleaner and let it drain into the oil pan, then i flushed it with a bottle of fresh oil, after everything is done I changed oil. Before inserting the gasket into the groove on the cover I put a thin layer of silicon then insert the gasket. Then put another thin layer of silicon on the gasket ( to me there is never enough silicon that stuff is one of the best inventions ever). Then tighten the screws: some people do it around and some from the middle out) so I start from the middle and work your way out. Then do the crank shaft pulley for the V-belt pulley. Valve cover and Crank shaft pulley for the V-belts: With the valve cover, first clean then valve area. I cleaned it with carb cleaner and let it drain into the oil pan, then i flushed it with a bottle of fresh oil, after everything is done I changed oil. Before inserting the gasket into the groove on the cover I put a thin layer of silicon then insert the gasket. Then put another thin layer of silicon on the gasket ( to me there is never enough silicon that stuff is one of the best inventions ever). Then tighten the screws: some people do it around and some from the middle out) so I start from the middle and work your way out. Then do the crank shaft pulley for the V-belt pulley. |
 Next put the the water pump pulley on and screw it in make it tight. Next put the PCV valve in and put the hose on and tight it. Next put the the water pump pulley on and screw it in make it tight. Next put the PCV valve in and put the hose on and tight it. |
 Belts: First the water pump/alternator belt, then power steering and A/C. Then tighten the belts, until you can press the middle of the belt till moves about 1/3 of an inch. That's tight enough. Belts: First the water pump/alternator belt, then power steering and A/C. Then tighten the belts, until you can press the middle of the belt till moves about 1/3 of an inch. That's tight enough. |
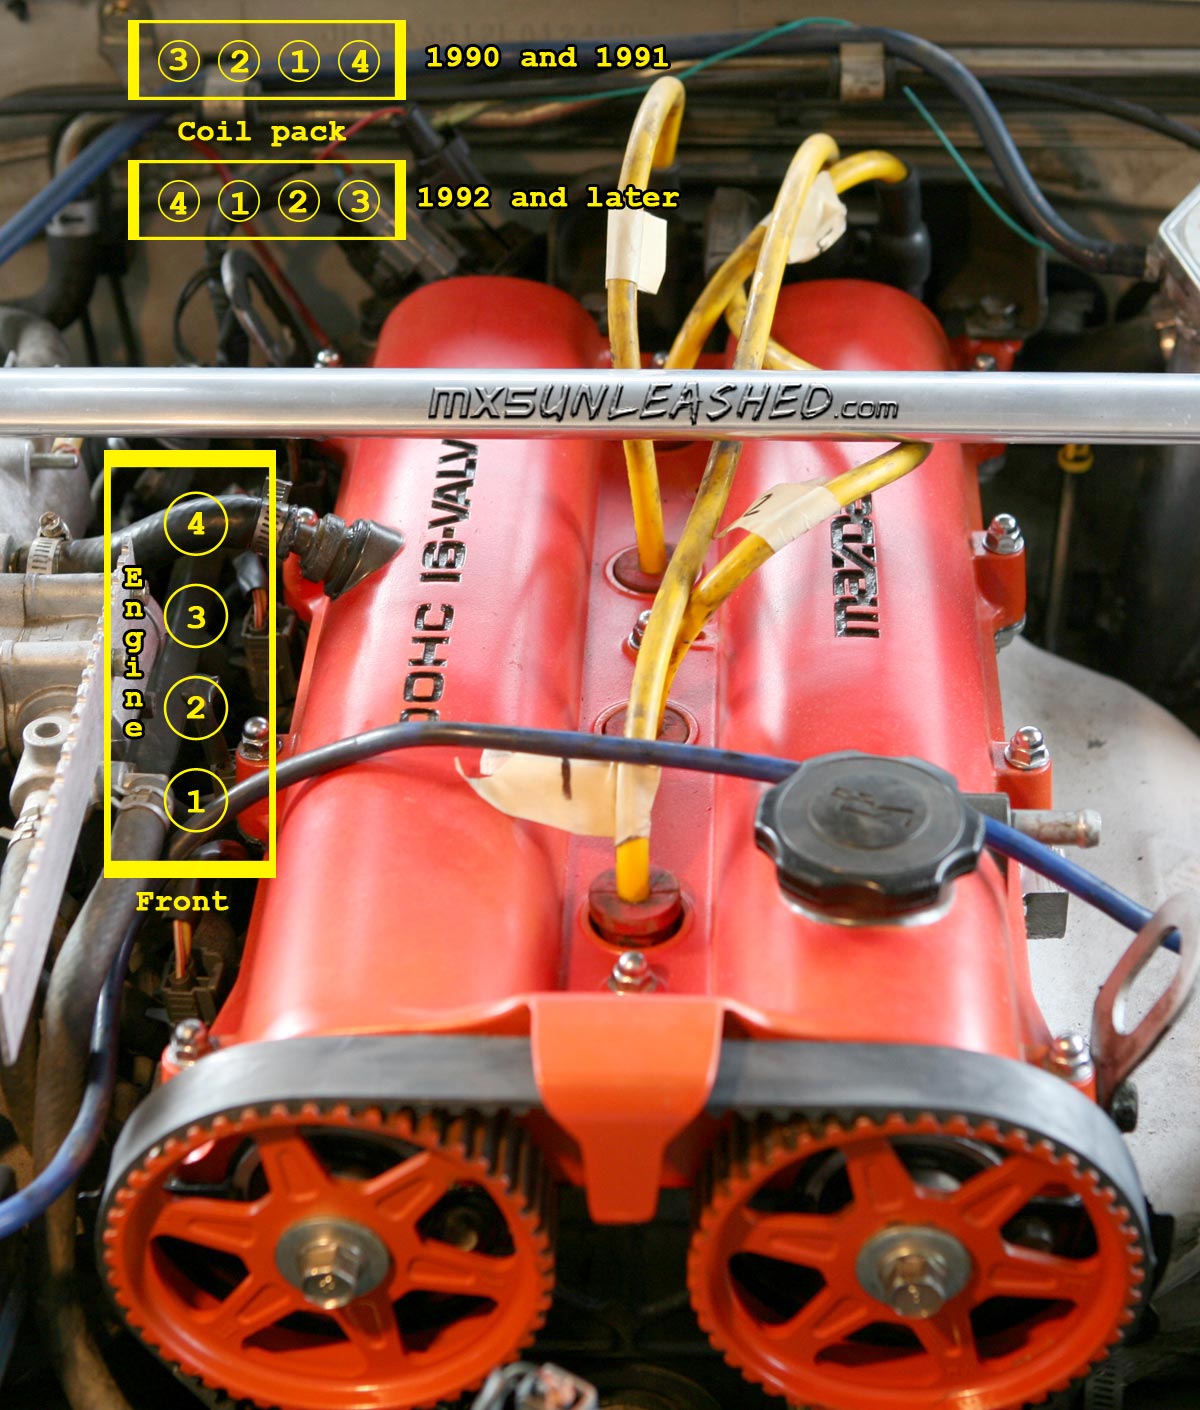 Ignition: First reinstall the coil pack, it has two screws on the side and one at the bottom. Then you you can reattach the sparkplug wires. The stickers you put in the beginning will help now, but here is the diagram just incase. This is not actual firing order because on MX-5s coil pack fires on two cylinders at the same time. One on compression and one on exhaust stroke. Ignition: First reinstall the coil pack, it has two screws on the side and one at the bottom. Then you you can reattach the sparkplug wires. The stickers you put in the beginning will help now, but here is the diagram just incase. This is not actual firing order because on MX-5s coil pack fires on two cylinders at the same time. One on compression and one on exhaust stroke. |
Then I would drain the oil and replace it. And you should be all done I hope this was helpful. Please let me know if i miss anything and if you have any questions and updates for later years. This was done on 1990 MX-5 Have great MX-5 day |
|